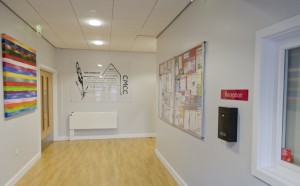
I was approached by the manager and a committee member of Chase Meadow Community Centre in Warwick , which, although was only around two years old needed of re-decorating due to the amount of use it gets.
All the usual problems in commercial areas were found as expected, scuffs on walls, Blu Tack residue, damage to walls and woodwork where things had knocked the surfaces and of course general dirt that the paint had picked up over the last two years.

I discussed the work with the manager of the centre and established the two most important factors required. Firstly a better quality, more durable paint that would also be easier to clean in future.
Secondly as the centre is in use virtually all day and well into the evening it made sense to carry out the work at night. One of the important things to consider when working within these constraints is all tools and materials must be cleared away after each night shift, so that the centre can continue without disruption during the day. It was also quite handy that there was a decent Chinese take away nearby!
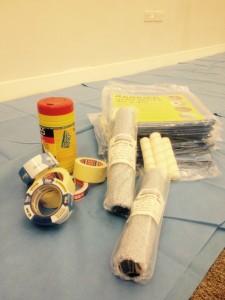
The specification was to re paint the walls, skirting boards and door frames. The centre was a charity so it was important to try and keep the cost down. The volunteers and centre manager made access easy for me as they provided a key and kept me informed of any activities which I had to work around. I specified good quality trade paints that were also competitively priced. My local supplier, Brewers, in Stratford upon Avon made a kind donation of almost half the paint. I also approached Trade 1st, who I get most my consumable items from and they donated some consumables towards the job, masking tape, roller sleeves, barrier dust sheets and a few sundries.
I specified Armstead Durable Acrylic Eggshell on the walls. This has a mid sheen finish and will mark less easily than the Vinyl Matt previously used. It can also be wiped clean. For the woodwork I specified Armstead Satin. This is an oil based product which can be used directly onto correctly prepared pre painted wood. It produces a nice satin finish, covers well in one coat and does not take too long to dry compared to some oil based products. Any small bare areas of wood were primed with Zinnser Bullseye Plus. This is a quick- drying water- based primer.
Firstly I removed any loose or degraded caulk around frames and skirting boards. To do this I used an Olfa L5-AL knife with dedicated blades. These are very sharp and make cutting out tough caulk a quick task. Any mess from the cutting out was vacuumed up using a Mirka 915 GB extractor. It is powerful so picks up even large items quickly and with ease.

The woodwork needed a good sand for two reasons. Firstly to de-gloss the surface and secondly to remove any roughness. The last painters had not been too careful and there was a lot of contamination in the paint which looks unsightly. Also de-glossing means that the new paint will adhere properly.
Most the sanding was carried out using a Festool RTS400-EQ which runs into the Mirka extractor. This is very efficient and is virtually dust free. Some areas had to be sanded manually so any residual dust was vacuumed up.


Cleaning is a very important step before decorating any surface and especially in commercial environments that have become contaminated with dirt. I used Virosol diluted at about 50 parts water 1 part Virosol. This was applied from a plant sprayer to the walls up to around 1m 50cm and the woodwork. The surface above this level was clean and only needed a few cobwebs removing. I applied the Virosol and rinsed with clean warm water and a Microfibre cloth. The cloths are good as they are lint free, cheap and disposable.
There was some filling to do in the walls, some to make good damage caused by chairs knocking the walls and a few cracks where the building had settled. I used my go to filler Toupret TX110. This is a tough resin based powder filler and can even be used on external corners. It also has no thickness limitation and is easy to sand.
Gaps on internal corners look unsightly. On this occasion I used a regular caulk to fill all the gaps and smoothed in with a wet finger.

Once the filler was dry I sanded using a Mirka Deros sander extracted as mentioned before. This uses an abrasive called Abranet. On the Festool Abranet can also be used but for the woodwork I used the dedicated Festool abrasive. For the manual sanding I used Mirka Goldflex or Abranet. Most the sanding was carried out using 120 and 150 Grit.

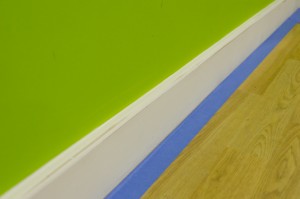
I used three types of masking tape. Tesa 3 day tape for any carpet edges. This is good quality and removes easily without breaking up. On hard floors for the skirting edges I used Blue 3M tape. Again a good quality tape which reduces the risk of paint bleeding onto the hard floor. I used Tesa low tack pink tape on top of the skirting boards. This prevents roller spray getting onto the sanded clean surface.
On large flat areas of flooring I use a blue barrier sheet supplied by Trade 1st. They are well priced and are paint proof should any drips come off the roller. They are not as well suited to small domestic jobs as they do not drape that well.
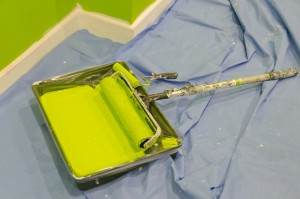
So now for some painting! As some bold colours were specified I opted for Friess 15 inch medium pile rollers. They hold a lot of paint, have minimal splatter, do not shed and are well priced. I have 3 Wooster GT Sherlock poles as they are quick to change if I need a different length pole. Washing out deep colours can be very time consuming so all the rollers on this job were disposed of. I also used Wooster 6.5 inch medium pile rollers for smaller areas of wall and for rolling over any edges which I had cut in with a brush. This means the entire wall is rolled rather than a combination of brush and roller. Overall this looks better. For the large roller I used a Wooster Big Ben Tray with a dedicated liner, available from www.mypaintbrush.com

I also used a Wooster Speed Bucket for the smaller roller and the brush. There were not many intricate areas and the majority of the wall brushing was done with a Pioneer 2.5 inch angled oval. I also masked off sockets, switches and any warning/emergency signs.
Some of the walls were over 3 meters so I used my telescopic ladder to access these areas. The top was padded with a soft cloth to save marking the walls. As I was working alone the ladder had an anti slip mat on its feet.


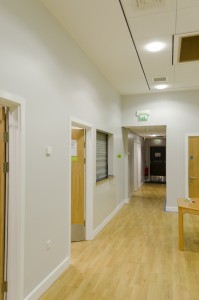
Two coats of Armstead Durable Eggshell were applied to the walls.
Once both coats had been applied I removed the pink tape to produce a nice sharp edge to which I could cut in the Armstead white satin. I decanted the paint into a Wooster Pelican and applied the paint with a 2 inch Corona Edge Chinex brush and a 4 inch foam roller. A couple of smaller brushes were also used for some intricate areas. I also added a little white spirit to the paint to help it flow.

The entire team who run the centre were very pleased with the work and they were also very helpful during the whole project. If you live in the Warwick area it is worth checking out their website for details of activities.